Group study room technology
Book a group study room

Connecting wirelessly at Webster and Vanier with AirMedia
Use AirMedia Presentation Software to wirelessly present your device's desktop onto a large screen in a Library Group Study Room.
See device-specific instructions below.
| 1. Connect to Wi-Fi Log into the ConcordiaUniversity wifi connection with your netname and password. Note: The Eduroam wifi connection will NOT connect to Airmedia. |
|
| 2. Locate the AirMedia Application The AirMedia Application is already installed. Look for the icon on the desktop. |
|
| 3. Accept the Terms of use |  |
| 4. Delegate session Select how you wish to delegate if others join the session. |
 |
| 5. Search for Devices The AirMedia application will then try to search for devices. This will generally fail. Wait a few seconds. |
|
| 6. Enter Receiver's IP Address Enter the receiver’s IP address listed on the bottom left of the large screen in the study room. If the connection is successful you will continue. |
 |
| 7. Enter 4-Digit Code Enter the 4-digit code presented on the large screen in the study room. |
 |
| 8. Start Presenting 8. You can now minimize the AirMedia application and start presenting the laptop's desktop on the large screen. |
| 1. Connect to Wi-Fi Log into the ConcordiaUniversity wifi connection with your netname and password. Note: The Eduroam wifi connection will NOT connect to Airmedia. |
|
| 2. Visit IP Address in Browser Start Presenting Open a browser. In the search bar, enter the receiver’s IP address listed on the large screen in the study room. |
 |
| 3. Download AirMedia app Download the Crestron AirMedia app for Windows, and install it on your personal laptop. |
 |
| 4. Enter 4-Digit Code After the installation is complete, open the AirMedia
app and enter the 4-digit code presented on the large screen in the study room. |
|
| 5. Start presenting You can now minimize the AirMedia application and start presenting your laptop's desktop on the large screen. |
| 1. Connect to Wi-Fi Log into the ConcordiaUniversity wifi connection with your netname and password. Note: The Eduroam wifi connection will NOT connect to Airmedia. |
|
| 2. Visit the IP address in a browser In a browser's search bar, enter the receiver’s IP address listed on the large screen in the study room, e.g. 10.257.216.257. |
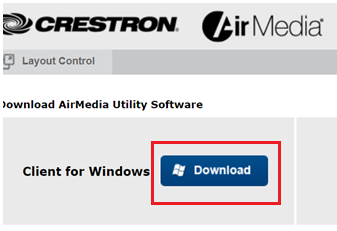
3. Download the Airmedia app for Mac Click the Mac branded download button. Note: the device may see it as coming from an "Untrusted Source". If so, go to:
|  |
| 4. Install the Airmedia app Navigate to the Downloads folder and double-click the disk image (.dmg) file to install the app. |
|
| 5. Launch the Airmedia app It will be in the Applications folder or Launchpad. |
|
| 6. Allow screen mirroring To allow screen mirroring on a Mac, go to System Settings > Privacy & Security > Privacy, then enable "Screen Recording" for Airmedia. You may need to quit and relaunch the app for the permission to take effect. |
|
7. Mirror your screen
|
 |
| NOTE: Earlier versions of Mac OS require the use of AirPlay. Look for the rectangle icon with a black triangle beneath. If you don't see the AirPlay icon in your menu bar, go to System Preferences > Displays and place a checkmark next to "Show mirroring options in the menu bar when available." Then click the AirPlay icon and select the Airmedia device. |
 |
Library iPads have the AirMedia application already installed. If using your personal iPad, you can download and install the AirMedia app from the App Store using your Apple ID.
| 1. Connect to Wi-Fi Log into the ConcordiaUniversity wifi connection with your netname and password. Note: The Eduroam wifi connection will NOT connect to Airmedia. |
|
| 2. Open AirMedia App Tap to open the AirMedia icon on the Home Screen. |
|
| 3. Agree to Terms and Conditions Agree to terms and conditions by putting a checkmark in both boxes. Then tap Agree. |
|
| 4. Enter Receiver's IP Address Enter the receiver's IP address listed on the large screen in the study room. |
|
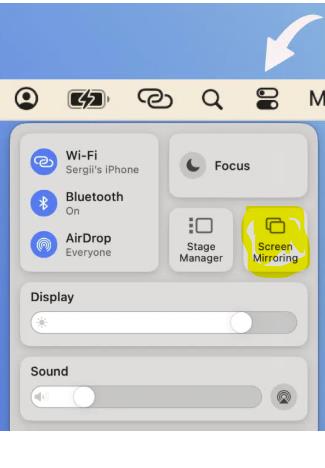
| 5. Open Control Centre From the top right hand corner of the iPad, swipe downwards to display the Control Centre. |
 |
| 6. Tap Screen Mirroring Tap "Screen Mirroring". |
 |
| 7. Select Matching IP Address Select the matching IP address listed on the large screen in the study room. |
|
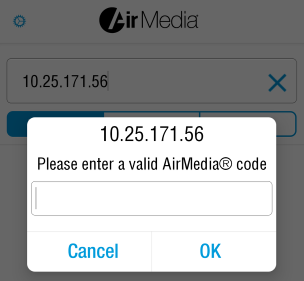
| 8. Enter 4-Digit Code Enter the 4-digit code listed on the large screen in the study room and click OK, then OK again to display the iPad on the large screen. |
| 1. Connect to Wi-Fi Log into the ConcordiaUniversity wifi connection with your netname and password. Note: The Eduroam wifi connection will NOT connect to Airmedia. |
|
| 2. Download and Open AirMedia App On your Android device, download the AirMedia app from the Play Store. Open the app after installation is complete. |
|
| 3. Agree to Terms and Conditions Agree to terms and conditions by putting a checkmark in both boxes. Then tap Agree. |
 |
| 4. Enter Receiver's IP Address Enter the receiver's IP address listed on the large screen in the study room. The tap the "Present with AirMedia" button. |
 |
| 5. Enter 4-Digit Code Enter the 4-digit code listed on the large screen in the study room and tap OK. |
 |